20+ Years Experience
Specialist Resin Flooring
Enquire Today For A Free No Obligation Quote
Epoxy flooring is a popular choice for many residential and commercial spaces due to its numerous benefits. This article provides top tips for a successful epoxy flooring installation to ensure long-lasting and visually appealing results.
Epoxy flooring offers several advantages, including:
Considering factors like the environment, desired finish, and traffic is essential in selecting the most suitable epoxy flooring system.
To ensure a successful installation, you’ll need various tools and equipment, including primer, epoxy resin, hardener, mixing tools, and application tools.
Follow these steps for a proper epoxy flooring installation:
Maintaining the epoxy flooring is key to its long-term performance, and proper care guidelines should be followed.
Finally, this article addresses common issues that may arise during or after the epoxy flooring installation and provides tips on how to troubleshoot them effectively.
By following these top tips, you can achieve a successful epoxy flooring installation that not only enhances the durability and performance of your floors but also adds aesthetic appeal to your space.
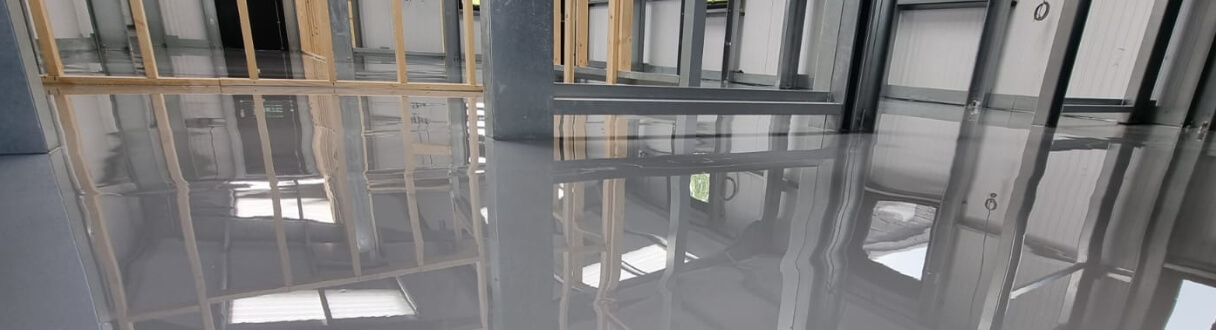
Discover the remarkable advantages of epoxy flooring in this section. Uncover how this innovative flooring solution provides durability and longevity to any space. Dive into the exceptional chemical resistance it offers, making it ideal for a variety of environments. Learn about the easy maintenance required to keep your floors looking flawless. Explore how epoxy flooring can enhance the aesthetic appeal of your space, creating a visually stunning environment. Get ready to explore the endless benefits of epoxy flooring!
Durability and longevity are important considerations when selecting epoxy flooring. To ensure a durable and long-lasting finish, there are several key points to remember:
Chemical resistance is a crucial consideration when selecting an epoxy flooring system. The following information provides an overview of epoxy flooring’s chemical resistance:
Epoxy flooring exhibits high resistance to a wide range of chemicals, including acids, solvents, oils, and cleaning agents.
This characteristic makes it an excellent choice for industries such as manufacturing, laboratories, warehouses, and automotive facilities, where exposure to chemicals is common.
The chemical resistance of epoxy flooring safeguards the underlying concrete from damage and ensures the floor’s durability.
Additionally, it simplifies cleaning and maintenance since spills can be easily wiped up without causing harm.
It is important to note that the level of chemical resistance may vary depending on the specific epoxy flooring system and the chemicals involved.
To ensure the selection of the appropriate epoxy flooring system with the desired level of chemical resistance, consulting with a professional and providing them with the specific chemical exposure in your facility is essential.
To maintain epoxy flooring easily, follow these steps:
Fun Fact: Epoxy flooring is renowned for its effortless maintenance, requiring minimal effort to keep it clean and shiny.
Aesthetic appeal is an important aspect to consider when it comes to epoxy flooring. Here are some key factors to focus on:
To ensure a smooth and durable flooring outcome, it is crucial to lay the foundation through effective pre-installation preparation. This section covers the essential steps needed for a successful epoxy flooring installation. These steps include meticulous surface preparation, moisture testing, and skillfully repairing cracks and imperfections. By equipping you with the necessary knowledge and techniques, we aim to provide you with the tools for a flawless epoxy flooring application. So, let’s prepare for a seamless installation process!
Before installing epoxy flooring, it is crucial to ensure proper surface preparation. This will ensure a successful and long-lasting result. Here are the steps involved:
Following these steps will help create a clean and properly prepared surface for the epoxy flooring installation, ensuring optimal adhesion and durability.
Remember, proper surface preparation is key to the success of your epoxy flooring installation. Taking the time to thoroughly prepare the surface will result in a smoother and more seamless installation process. Good luck with your epoxy flooring project!
Moisture testing is an essential part of the pre-installation preparation process for epoxy flooring. It is necessary to determine the moisture level of the substrate in order to ensure a proper bond and prevent issues such as bubbling, delamination, or the growth of mold. Here are the steps to follow for moisture testing:
Moisture testing in flooring has been a common practice for many years to prevent costly and time-consuming problems caused by excessive moisture levels. It has evolved with advancements in technology, with moisture meters and moisture mitigation techniques becoming more sophisticated and effective.
Repairing cracks and imperfections is a crucial step in the installation of epoxy flooring. Follow these steps to ensure a successful repair process:
The right epoxy flooring system is crucial for a successful installation. In this section, we’ll explore key factors that will help you make an informed decision. We’ll discuss considerations for the environment, determining the desired finish, and evaluating traffic and usage. These insights will ensure that you select the perfect epoxy flooring system tailored to your specific needs. So, let’s dive in and discover how to choose the ideal flooring solution for your space.
When selecting the appropriate epoxy flooring system, it is crucial to take into account the environment in which it will be installed. Here are some factors to consider:
By considering the environment and selecting the appropriate epoxy flooring system, you can ensure a successful installation that meets your specific needs and promotes sustainability.
When selecting an epoxy flooring system, it is crucial to determine the desired finish. Consider the following aspects to achieve the desired aesthetic appeal:
Considering these factors will help you determine the desired finish and achieve the aesthetic outcome you envision for your epoxy flooring.
Evaluating the traffic and usage is essential when selecting the appropriate epoxy flooring system. It is important to consider the level of foot traffic, vehicle traffic, and the type of activities that will occur on the surface. Below is a breakdown of factors to consider:
| Traffic Level | Recommended Epoxy System |
|---|---|
| Light foot traffic | Thin mil epoxy coating |
| Moderate foot traffic | Mid-grade epoxy system |
| Heavy foot and vehicle traffic | High-performance epoxy system |
| Chemical exposure | Chemical-resistant epoxy system |
By evaluating the traffic and usage, you can choose the epoxy flooring system that can withstand the demands and provide the desired durability and performance. It is advisable to seek advice from a professional for specific recommendations based on your unique requirements.
To ensure a successful epoxy flooring installation, it is essential to have the correct tools and equipment. This section will discuss the necessary essentials for achieving a flawless finish. We will cover a range of items, including the primer for ensuring proper adhesion, as well as the epoxy resin and hardener that create a durable and glossy surface. Additionally, we will explore the various types of mixing and application tools that will make the installation process smooth and effortless. Prepare yourself for a professional epoxy flooring project.
A primer is a crucial component of the epoxy flooring installation process. It helps to promote adhesion between the substrate and the epoxy resin. This creates a strong bond and ensures the longevity and durability of the epoxy flooring system. The primer also helps to prevent issues like peeling, bubbling, or delamination. When selecting a primer, it’s important to consider factors such as the type of substrate, moisture content, and desired finish. Proper application of the primer is vital for the success of the entire installation process as it provides a solid foundation for the subsequent layers of epoxy resin and topcoat.
Epoxy resin is a crucial component of epoxy flooring systems, providing durability, chemical resistance, and a smooth finish. When selecting an epoxy resin for your flooring project, consider factors such as the environment, desired finish, and traffic levels. Proper surface preparation is essential before applying the epoxy resin, including moisture testing and repairing any cracks or imperfections. Tools and equipment required for installation include a primer, epoxy resin, hardener, as well as mixing and application tools. Following the step-by-step installation process, which involves mixing the epoxy resin, applying the primer and epoxy resin, and adding decorative flakes, ensures a successful epoxy flooring installation.
The hardener is an essential component in the installation process of epoxy flooring. It is responsible for catalysing the resin and initiating the chemical reaction that creates a strong and durable surface. Here is a table summarising the key details about the hardener:
| Role: | Activates the chemical reaction with epoxy resin |
| Type: | There are different types of hardeners available, including standard, fast-curing, and high-performance options |
| Mixing Ratio: | Follow the manufacturer’s instructions to achieve the correct mixing ratio of hardener to epoxy resin |
| Curing Time: | The hardener determines the curing and drying time of the epoxy flooring system. It is important to allow sufficient curing time for a strong and durable finish |
When working with epoxy flooring, it is essential to choose the appropriate hardener based on your specific project requirements and environment. Follow the manufacturer’s recommendations and guidelines for a successful installation. Always wear protective gear and ensure proper ventilation during the mixing and application process. Regular maintenance and care can prolong the lifespan of your epoxy flooring.
Mixing tools are necessary for a successful installation of epoxy flooring. These tools ensure the proper mixing of the epoxy resin and hardener, creating a uniform and strong mixture. Below is a table that lists the mixing tools required for the installation process:
| Mixing Tools |
| Electric drill with paddle attachment |
| Bucket or mixing container |
| Measuring cups or scales |
| Spatula or mixing stick |
These tools ensure accurate measurement and thorough blending of the epoxy components, resulting in a smooth and consistent mixture. Proper mixing is crucial to achieve the desired chemical reaction and ensure the durability and longevity of the epoxy floor.
Application tools are essential for a successful epoxy flooring installation. These tools facilitate the correct application of epoxy resin, ensuring a smooth and even finish. Here are some commonly used application tools:
| Tool | Description |
| Roller | Used to apply epoxy resin to larger surface areas |
| Brush | Allows for precise application in tight corners or edges |
| Squeegee | Used to spread and level the epoxy resin |
| Notched Trowel | Used for applying epoxy coatings with textured finishes |
| Spiked Roller | Helps remove trapped air bubbles for a smoother surface |
Remember to clean and maintain your application tools properly to ensure their longevity and effectiveness. A pro-tip: Start with a small test area before proceeding with the entire installation to familiarise yourself with the use of these tools and achieve the desired results.
A well-executed step-by-step process is key when it comes to epoxy flooring installation. Let’s dive into the details of how to achieve a successful installation. We’ll cover everything from mixing the epoxy resin and hardener to adding decorative flakes and applying a clear topcoat. Get ready to discover the secrets behind each stage of this transformative flooring journey.
Mixing the epoxy resin and hardener is a crucial step in the installation process of epoxy flooring. It is important to follow the manufacturer’s instructions and use the correct ratio of resin to hardener to ensure proper curing and a strong bond. Here is a step-by-step guide:
True story: A homeowner, Matt, decided to install epoxy flooring in his garage. He carefully measured and mixed the resin and hardener, following the instructions. He forgot to take into account the pot life of the epoxy. As a result, by the time he finished mixing and started applying the epoxy, it had already begun to harden. The lesson learned: always be aware of the pot life and work quickly to ensure a successful epoxy flooring installation.
Before applying epoxy resin to your flooring, it is important to properly prepare the surface by applying a primer. Here are the steps involved in applying the primer:
By following these steps and properly applying the primer, you will ensure a solid foundation for the rest of your epoxy flooring installation.
Applying the epoxy resin involves several important steps to ensure a successful installation:
For a successful epoxy resin application, remember to work in a well-ventilated area, follow safety precautions, and carefully follow the manufacturer’s instructions. Ensure proper curing and drying time to achieve the desired results.
Adding decorative flakes to epoxy flooring can enhance its appearance and create a unique design. Here is a list of steps to follow when adding decorative flakes:
Adding decorative flakes can transform a plain epoxy floor into a visually appealing and durable surface.
Applying a clear topcoat is an essential step in the epoxy flooring installation process. It provides a protective barrier, enhances the floor’s appearance, and increases its durability. Here are the steps involved in applying a clear topcoat:
Prepare the surface by ensuring it is clean, dry, and free from any debris.
Mix the clear topcoat according to the manufacturer’s instructions.
Use a roller or brush to apply an even coat of the topcoat to the entire floor surface.
Allow the topcoat to dry completely before applying additional coats, if necessary.
Apply additional coats as needed, following the recommended drying time between each coat.
Ensure proper ventilation during the drying process to allow for adequate curing.
Once the topcoat is completely dry and cured, the epoxy flooring installation is complete.
By following these steps, you can ensure a successful application of the clear topcoat, resulting in a beautiful and long-lasting epoxy floor.
The curing and drying time are important factors to consider when installing epoxy flooring. They determine the duration for which the epoxy needs to fully harden and the floor to be ready for use. The table below presents general guidelines for curing and drying times of epoxy flooring based on the type of epoxy and temperature conditions:
| Type of Epoxy | Curing Time | Drying Time |
|---|---|---|
| Standard Epoxy | 24-48 hours | 3-5 days |
| Fast-curing Epoxy | 8-12 hours | 2-3 days |
| Cold-weather Epoxy | 48-72 hours | 5-7 days |
It’s important to note that these times may vary depending on the specific epoxy product and the environmental conditions during installation. It is advisable to follow the manufacturer’s recommendations for optimal results.
Proper care and maintenance after installing epoxy flooring is essential for ensuring its longevity and durability. Follow these steps to keep your floor in good condition:
– Clean regularly: Remove dirt and debris by sweeping or vacuuming the floor.
– Prevent scratches: Place floor protectors under furniture and avoid dragging heavy objects.
– Avoid moisture: Immediately wipe up spills and use mats in areas prone to wetness.
– Use mild cleaners: Stay away from harsh chemicals that can harm the epoxy and instead use pH-neutral cleaners.
– Inspect for damage: Regularly check for cracks, chips, or areas that require touch-up.
Troubleshooting common issues during an epoxy flooring installation is crucial to ensure a successful outcome. Here are the steps to address these problems:
There are several essential aspects to consider for a successful epoxy flooring installation:
Epoxy flooring offers several practical benefits for basement floors:
The final coat in an epoxy flooring installation is a topcoat. It provides additional protection and enhances the durability of the epoxy floor. The topcoat is usually a glossy clear finish that is easy to clean, but a matte finish can also be chosen for better imperfection hiding. The topcoat can be applied after the epoxy floor has cured.
Garage floor coverings, such as garage floor mats and sheet PVC vinyl flooring, provide some protection for the underlying floor and are resistant to petrol, oil, and cleaning chemicals. They are relatively easy to install and remove. On the other hand, epoxy garage floor coatings, which are a two-part system of resin and hardener, are considered to be a more durable and long-lasting option. They provide a professional finish and are specifically designed to handle the challenges faced by garage floors, such as oils, chemicals, spills, and scrapes.
Epoxy garage floor coatings have several advantages over garage floor paint:
Yes, epoxy flooring can be installed by DIY enthusiasts. Following the proper steps and watching detailed video tutorials can help ensure a beautiful and durable epoxy coating. It is important to gather the required tools, properly prepare the concrete surface, mix the epoxy resin and hardener correctly, and apply the epoxy mixture evenly. Attention should be paid to choosing the desired color, thickness, and finish, as well as following the manufacturer’s instructions for curing and applying additional coats if desired.
We Aim To Reply To All Enquiries With-in 24-Hours