20+ Years Experience
Specialist Resin Flooring
Enquire Today For A Free No Obligation Quote
Installation Guide: How to Lay Resin Flooring Correctly
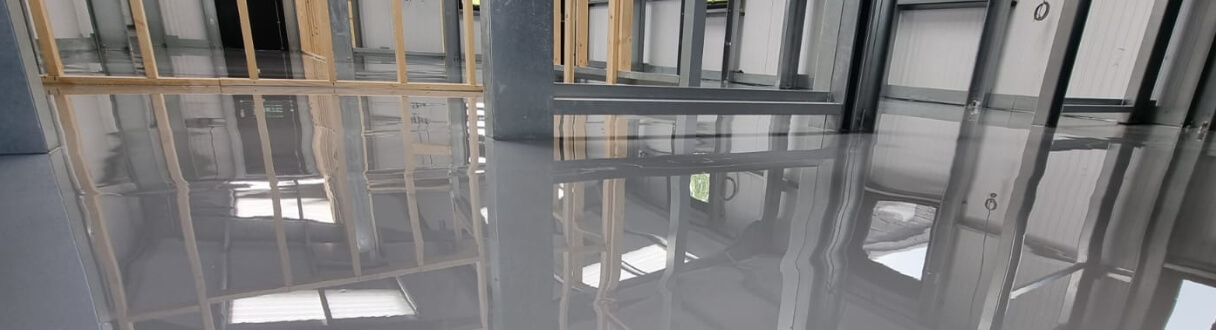
Resin flooring is a popular choice for both residential and commercial spaces due to its durability, versatility, and aesthetic appeal. Whether you’re looking to revamp your home or upgrade your workspace, resin flooring can be an excellent option. Before you begin the installation process, it’s essential to understand why resin flooring is a preferred choice and the benefits it offers.
Why Choose Resin Flooring?
Resin flooring offers several advantages that make it a desirable choice for various applications. Firstly, it provides a seamless and smooth surface, giving a modern and sleek appearance to any room or area. resin flooring is highly durable, resistant to heavy foot traffic, scratches, and stains, making it ideal for high-traffic spaces like restaurants, offices, and retail stores. It is also easy to clean and maintain, requiring minimal effort for its upkeep. Lastly, resin flooring is available in a wide range of colours, finishes, and designs, allowing for endless possibilities to match your aesthetic preferences.
Preparation before Installation
Before you start the installation process, proper preparation is crucial. This includes undertaking surface preparation to ensure a smooth and clean base for your resin flooring. Moisture testing is also essential to prevent any issues that may arise due to moisture in the substrate. The next step involves priming the substrate to enhance adhesion and ensure proper bonding between the resin and the surface.
To successfully lay resin flooring, you will need specific materials and tools. These may include epoxy resin components, a mixing paddle, squeegee or roller, a trowel or leveler, notched trowel, and any additional decorative elements you may want to incorporate into your flooring design.
In the following sections, we will provide a step-by-step guide to help you lay resin flooring correctly, from mixing the resin components to applying the protective top coat. We will also share tips for drying, curing, and maintaining your resin flooring to ensure its longevity and beauty.
By following this installation guide, you can achieve a professionally laid resin floor that enhances the aesthetics and functionality of your space.
Resin flooring has a multitude of benefits that make it an appealing choice for any space. From superior durability to easy maintenance, resin flooring offers a range of advantages that are hard to ignore. This section will explore the various benefits of resin flooring and explain why it has become a popular option for both residential and commercial applications. Prepare to discover the advantages that set resin flooring apart from other options.
Resin flooring offers numerous benefits that make it a popular choice for residential and commercial spaces.
Durability: Resin flooring is renowned for its exceptional durability, making it resistant to heavy foot traffic, scratches, and stains.
Easy Maintenance: With its seamless surface, resin flooring is easy to clean and maintain, requiring minimal effort and reducing the need for harsh cleaning chemicals.
Hygiene: Resin flooring is non-porous, preventing the growth of bacteria and making it a hygienic option for spaces that require high levels of cleanliness, such as hospitals or food preparation areas.
Design Versatility: Resin flooring comes in a wide range of colours, finishes, and decorative elements, allowing for endless design possibilities to match any aesthetic preference.
Safety: Resin flooring can be formulated with anti-slip properties, providing an added level of safety for areas prone to spills or wet conditions.
Pro-tip: Consider adding a UV-resistant top coat to your resin flooring to ensure its longevity and maintain its vibrant colour over time.
Get ready to lay resin flooring correctly with our comprehensive installation guide! This section covers the crucial steps you need to take before the installation process begins. From surface preparation to moisture testing and priming the substrate, we’ve got you covered. These essential tasks will ensure a smooth and durable resin flooring that stands the test of time. Let’s dive in and make your flooring project a success!
Before installing resin flooring, it is important to carry out proper surface preparation in order to achieve a successful and long-lasting outcome. The following steps should be followed for surface preparation for resin flooring:
By following these steps, you will ensure that the substrate is clean, level, and properly primed for the installation of resin flooring. This will result in a durable and visually appealing finished product.
Moisture testing is an important step in the preparation process prior to installing resin flooring. It helps to identify any moisture-related issues that could impact the durability and performance of the flooring. The following steps outline the process of moisture testing:
It is crucial to ensure that the substrate is free from moisture before proceeding with the installation of resin flooring. This will help prevent future problems like bubbling or delamination. By following these steps, you can ensure a successful and long-lasting resin flooring installation.
Remember, accurate moisture testing is vital to ensure the longevity and performance of your resin flooring. It is always advisable to consult an expert or adhere to the manufacturer’s guidelines for precise testing and appropriate solutions.
Before installing resin flooring, it is important to properly prime the substrate. This step ensures better adhesion and a smooth, even surface for the resin coating. Here is a step-by-step guide to priming the substrate:
By following these steps, you can ensure that the substrate is properly prepared for the resin flooring installation, resulting in a durable and long-lasting finish.
Historical Fact: Resin flooring has been used for centuries in various forms. In ancient Egypt, for example, a mixture of natural resins, oils, and pigments was used to create decorative and durable floors.
Having the right materials and tools is essential for laying resin flooring correctly. Here are some of the items you’ll need:
Fact: Using high-quality materials and tools can greatly contribute to the durability and longevity of your resin flooring.
Are you planning to lay resin flooring? This comprehensive guide will take you through the entire process of laying resin flooring, including mixing the resin components and incorporating decorative elements. You will learn how to apply the resin primer, spread the resin coating, and add a protective top coat. With these steps, you can easily transform your space and achieve a flawless resin floor. Let’s get started and turn your flooring dreams into a reality!
Mixing the resin components is the first step in laying resin flooring. To ensure a successful installation, follow these steps:
Suggestions for successful mixing:
By following these steps and suggestions, you can achieve a well-mixed resin mixture for your flooring project.
Applying the resin primer is a crucial step in the process of laying resin flooring. Below are the steps to be followed:
To ensure a successful application of the resin primer, it is also important to:
Properly spreading the resin coating is crucial for achieving a smooth and durable finish for your resin flooring.
To enhance the aesthetic appeal of resin flooring, the fourth step involves adding decorative elements. Here is a step-by-step guide on how to incorporate decorative elements into your resin flooring:
Suggestions:
Applying a protective top coat is an essential step in the process of laying resin flooring. Here is a step-by-step guide to applying the protective top coat:
Pro tip: For improved safety and durability, consider incorporating anti-slip additives into the top coat.
To ensure a successful resin flooring installation, it is important to have a good understanding of the drying and curing process. Here are the key steps to consider:
By following these steps, you can achieve a resilient and long-lasting resin flooring installation.
Keep your resin flooring in pristine condition with these essential maintenance tips. From routine cleaning to preventing damage and stains, we have you covered. Find practical advice and expert insights to ensure your resin flooring remains durable and visually stunning. Bid farewell to unsightly blemishes and welcome a well-maintained and long-lasting floor. Prepare to enhance the beauty and longevity of your resin flooring with our helpful tips and tricks.
Proper cleaning and regular maintenance are essential for maintaining the appearance and durability of resin flooring.
“`
Preventing damage and stains is essential for maintaining the longevity and appearance of resin flooring.
Fun fact: Resin flooring is not only durable and easy to maintain, but it can also provide a seamless and visually appealing surface for various spaces.
“`
The recommended ratio for mixing aggregate with resin when installing resin bound stone should be followed according to the manufacturer’s instructions.
No, resin bound stone is porous and cannot be used to create falls or slopes.
Environmental factors such as moisture in the air or damp surfaces can negatively affect the finished product of resin bound stone.
Epoxy flooring offers a variety of practical benefits including durability, chemical resistance, heat resistance, low maintenance, and anti-slip properties.
Yes, alternatives to epoxy flooring include floating timber flooring, stone flooring, tiles, vinyl, and working with raw concrete by polishing or staining it.
Yes, professional installation is recommended when comparing epoxy flooring to tiles to ensure the desired finish and correct material usage.
We Aim To Reply To All Enquiries With-in 24-Hours